
SolarEdge SE7K Modbus TCP

Ik wilde mijn oudere SolarEdge SE7K omvormer uit 2017 (de variant met LCD display) lokaal kunnen uitlezen en netjes softwarematig kunnen beperken bij negatieve stroomprijzen. De SolarEdge cloud/API werkt prima, maar ik wilde:

  • geen afhankelijkheid van internet/cloud
  • realtime lokale data
  • integratie met Node-RED
  • de omvormer automatisch kunnen curtailen bij negatieve prijzen

In eerste instantie ging ik er vanuit dat ik hiervoor de seriële RS485-poort moest aansluiten. Na wat verder onderzoek bleek echter dat deze oudere SE7K gewoon Modbus TCP ondersteunt via Ethernet. De netwerkkabel zat al aangesloten. Modbus TCP hoefde alleen nog aangezet te worden in het menu van de omvormer.

Modbus TCP kort uitgelegd

Modbus TCP is een simpel industrieel protocol waarbij registers gelezen en geschreven worden via TCP/IP.

De SolarEdge exposed intern een SunSpec registermap via Ethernet.

Dus:

  • uitlezen van actuele productie
  • temperatuur
  • lifetime opbrengst
  • netspanning
  • status
  • en zelfs active power limiting

Navigeren op de oude LCD SolarEdge

Deze oudere generatie heeft slechts één knop onder het display. De bediening werkt als volgt:

  • korte druk = door menuopties bladeren
  • lange druk = bevestigen / enter

Modbus TCP aanzetten

Via het LCD-menu:

Daarna rebooten (belangrijk, anders draait de Modbus service nog niet!):
  1. DC switch uit
  2. 1 minuut wachten
  3. AC uit
  4. AC aan
  5. DC aan

Daarna staat poort 502 open. Controleer dit met het onderstaande bash commando:

nc -vz 192.168.1.72 502

Python setup

Installeren:

pip3 install pymodbus

Actueel vermogen uitlezen

Bij mijn SE7K zit het actuele AC-vermogen op:

Address 83

Script:

from pymodbus.client import ModbusTcpClient

client = ModbusTcpClient("192.168.1.72", port=502)

rr = client.read_holding_registers(
    address=83,
    count=2,
    device_id=1
)

power = rr.registers[0]
scale = rr.registers[1]

if scale > 32767:
    scale -= 65536

print(power * (10 ** scale), "W")

client.close()

Voorbeeld output:

1838.0 W

Interessante registers voor de SE7K

Functie Address
AC vermogen 83
Lifetime energy 93
Temperatuur 95
Netfrequentie 96
AC voltage 76
DC voltage 71
Status 107

Statuscodes:

Waarde Betekenis
1 Off
2 Sleeping
4 Producing
5 Production limited
7 Fault

Curtailment / Active Power Limit

Curtailment betekent het bewust beperken van de zonneproductie.

Dus:

  • panelen kunnen meer leveren
  • maar de omvormer wordt softwarematig begrensd

Bijvoorbeeld:

  • 100% = normaal
  • 50% = halve productie
  • 0% = praktisch uit

Handig bij negatieve stroomprijzen.

SolarEdge registers voor power limiting

Bij mijn SE7K werken deze registers:

Register Functie
61762 Advanced Power Control enable
61441 Active Power Limit (%)
61696 Commit/apply settings

Omvormer op 0W zetten

Dit script zet de omvormer netjes softwarematig op 0% productie:

from pymodbus.client import ModbusTcpClient
import time

HOST = "192.168.1.72"
PORT = 502
DEVICE_ID = 1

# 0 = uit
# 50 = halve productie
# 100 = normaal
LIMIT_PERCENT = 0

client = ModbusTcpClient(HOST, port=PORT, timeout=5)

try:
    print("Connect:", client.connect())

    # Advanced Power Control enable
    client.write_registers(
        address=61762,
        values=[0, 1],
        device_id=DEVICE_ID
    )

    time.sleep(1)

    # Active Power Limit
    client.write_register(
        address=61441,
        value=LIMIT_PERCENT,
        device_id=DEVICE_ID
    )

    time.sleep(1)

    # Commit/apply
    client.write_register(
        address=61696,
        value=1,
        device_id=DEVICE_ID
    )

    time.sleep(10)

    # Actueel vermogen uitlezen
    rr = client.read_holding_registers(
        address=83,
        count=2,
        device_id=DEVICE_ID
    )

    power = rr.registers[0]
    scale = rr.registers[1]

    if scale > 32767:
        scale -= 65536

    print("Limit set to:", LIMIT_PERCENT, "%")
    print("Current AC power:", power * (10 ** scale), "W")

finally:
    client.close()

Bij LIMIT_PERCENT = 0 ging mijn SE7K daadwerkelijk naar:

0 W

zonder harde uitschakeling van de omvormer.

Referenties

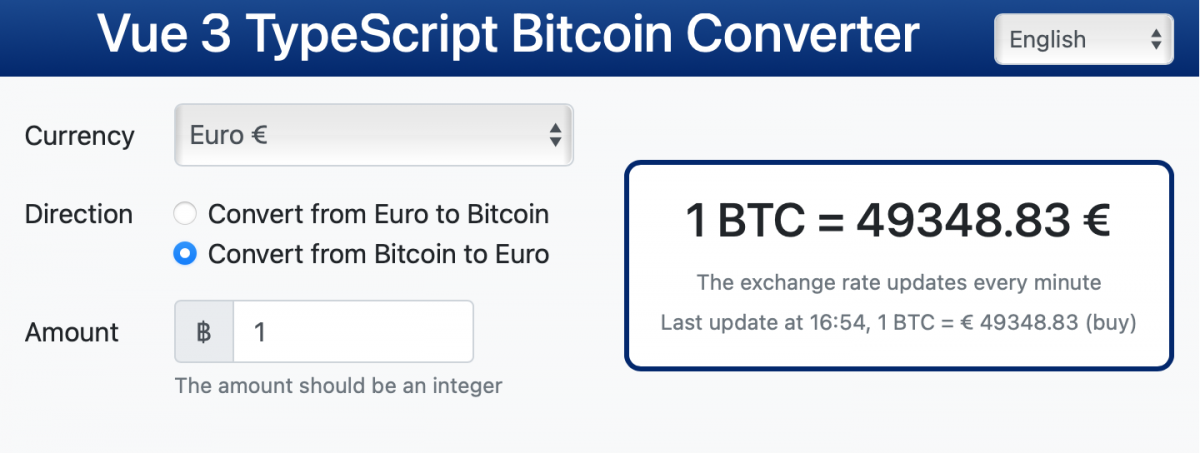
Vue 3 TypeScript edition

The biggest notable new features for Vue 3 are the Composition API  and full support for TypeScript. Overall Vue 3 is mostly backwards compatible. The only change I’ve found rewriting the Bitcoin Converter is that in 3.x, filters are removed and no longer supported. Instead, they can be replaced by a method call.

And there’s a new build tool in the Vue ecosystem called Vite. Its dev server is 10-100x faster than Vue CLI’s. We used Vite instead of Vue-CLI this time to scaffold the project and to start the dev server.

Composition API

To read in detail about the Composition API, see the original Vue documentation about the Composition API: An introduction to the Composition API.

Basically everything for the component is now initialised in the new setup function. This function is executed before the component is created, once the props are resolved, and serves as the entry point for composition API’s.

Reactive variables need to be wrapped in ref() functions.

A components setup function might look like this:

import { fetchUserRepositories } from '@/api/repositories'
import { ref, onMounted, watch, toRefs } from 'vue'
 
setup (props) {
  
  const { user } = toRefs(props)
  const repositories = ref([])
  const getUserRepositories = async () => {    
    repositories.value = await fetchUserRepositories(user.value)
  }
 
  onMounted(getUserRepositories)
  watch(user, getUserRepositories)
 
  return {
    repositories,
    getUserRepositories
  }
}

TypeScript

TypeScript enables us to use types and have those types checked during the compile phase.

setup(props: Readonly<IProps>) {
    const loadingStatus = ref<String>(LOADING_STATUS.NOT_LOADING);
    const loadingError = ref<String>();
    const tickerPrice = ref<TickerPrice>();
}

“Vite” Build Tooling

Similar to Vue CLI, Vite is also a build tool providing basic project scaffolding and a dev server.

However, Vite is not based on Webpack and has its own dev server which utilizes native ES modules in the browser. This architecture allows is to be orders of magnitude faster than Webpack’s dev server.

Vite is currently in beta and it appears that the aim of the Vite project is not to be an all-in-one tool like Vue CLI, but to focus on providing a fast dev server and basic build tool.

Demo

Live demo Vue 3 – Bitcoin Converter

https://sandbox.juurlink.org/vue3/

Resources


All variants of the Bitcoin Converter Application

  • 2021 – Vue 3 TypeScript Bitcoin converter application blog src demo
  • 2020 – Vue.js Bitcoin converter application – part 2 blog src demo
  • 2019 – Vue.js Bitcoin converter application – part 1 blog src demo
  • 2017 – Angular Bitcoin converter application [blog] src demo
  • 2013 – AngularJS Bitcoin converter application blog src demo
  • 2013 – Backbone Bitcoin converter application blog src demo

Mutual Exclusion in Javascript

According to Wikipedia Mutual Exclusion means:

Mutual exclusion is a property of concurrency control, which is instituted for the purpose of preventing race conditions. It is the requirement that one thread of execution never enters its critical section at the same time that another concurrent thread of execution enters its own critical section.

Well in short it means execute only a part of the code by one thread at the same time.

Back in my Java days™️, Java had a nice simple keyword to make a method synchronized, which means mutually exclusive. Javascript doesn’t have something similar, that’s the reason I came up with this Javascript mutex implementation. It’s probably not perfect, but hey, it does the job!

This example shows how to create a function that returns a promise in which the work executes synchronized:

See Github for full source code


const data = {
    counter: 0
}

/**
 * Some heavy calculations in a promise.
 *
 * @param {number} executionSequence The index number of execution
 * @param {{counter:number}} data Wrapper object with counter
 * @return {Promise<number>} Promise that resolves on success or rejects otherwise
 */
function execute(executionSequence, data) {
    const promise = new Promise(resolve => {
        synchronized(release => {

            // Release the lock when the promise is done.
            promise.finally(release);

            // Wait a random time between 0 and 2 seconds.
            setTimeout(() => {

                data.counter++;
                console.log('Execute promise: ' + executionSequence);
                console.log('Counter: ' + data.counter);
                resolve(data.counter);

            }, Math.random() * 2 * 1000);
        });
    });
    return promise;
}

for (let i = 1; i <= 10; i++) { console.log(`==== Create promise: ${i}`); execute(i, data).then(result => {
        console.log(`Promise success: ${i}, result: ${result}`);
    })
}


The title image is shamefully stolen from this article:
Mollie: How to use Mutex locks responsibly

Template Literals Templating

What are Template Literals?

Template literals are string literals allowing embedded expressions. You can use multi-line strings and string interpolation features with them. Template Literals are part of the ES6 specification.

Actually they even contain the basic requirements to use it as a templating language!

Continue reading “Template Literals Templating”

Vue.js; AngularJS done right! – part 2

Just started with Vue? Please read part 1 first. It’s a small introduction into the Vue framework.

In part one we have created our first application using Vue. Functionally that application is complete but it is lacking a nice architecture, it is not translated, it did not have any unit tests and we did not leverage the complete power of single file components and CLI tooling to scaffold the project.

Continue reading “Vue.js; AngularJS done right! – part 2”

Vue.js; AngularJS done right!

This post describes briefly my first impressions of working with the Vue frontend framework.

I have been using Vue for only a couple of days now and during these days I have created an example application (a bitcoin converter).

Before, I have created the same application using other frameworks like AngularJS and Backbone, so this makes a comparison between the use of different frameworks possible.

Continue reading “Vue.js; AngularJS done right!”

Run Jenkins Automation Server as Docker Image

Introduction

Even for my side projects it is convenient to have my personal automation server run. As far as I know, this type of server is also known as Continues Integration CI environment and I use those terms interchangeable. Beside being convenient, it is also fun and I might even learn something from it!

The most popular open source CI at this moment is Jenkins. So that is the one I am going to install.

Continue reading “Run Jenkins Automation Server as Docker Image”

HTTPS is easy and completely free!

After watching a talk about encryption from Yan Zhu online (JSConf Budapest 2016 – Encrypt the Web For $0) I decided to try Let’s Encrypt again to enable HTTPS on a website. I used Let’s encrypt before in November 2015. At that time the Let’s Encrypt project was in private beta and required a lot of manual configuration to get things configured. But right now the tools to configure Let’s encrypt seem really really mature.

Continue reading “HTTPS is easy and completely free!”